
Follow a repeatable order: shape, light, ribbon, add depth, then finish. This sequence stops constant rearranging and protects your branches from damage.
The tree recipe: step-by-step styling for a professional look gives you clear placement rules and useful quantities for any tree size. A polished result comes from careful layers, not piles of ornaments.
1. Shape, Zone, and Light
Fluff every branch from the trunk to the tip before adding decorations. This single task makes a thin tree look fuller and creates firm places for lights and ornaments.
Divide the Tree Into Bands
Split a 7-foot tree into three visual bands: top, middle, and bottom. Work on one band at a time, turning branches upward, outward, and slightly downward to fill visible holes.
View the tree from the sofa or main doorway. The wider view reveals gaps that disappear when you stand close.
Weave Lights Through Branches
Use about 700 lights for a bright, professional finish. Weave them inward near the trunk and outward toward the tips instead of circling only the surface.
Check each band for dark gaps before moving on. Lights near the trunk create depth, while bulbs near the tips add sparkle and define the tree’s shape.

2. Build a Dark Inner Layer
A common mistake is placing every ornament on the outer tips. This leaves the center bare and makes the decorations look flat. Build depth first with dark, matte ornaments near the trunk.
Hang 12 to 18 inexpensive ornaments within the inner third of a 7-foot tree. Deep green, navy, charcoal, bronze, or dark burgundy work well because they create soft shadows behind brighter pieces.
Choose simple plastic ornaments with a matte finish. Shiny surfaces reflect nearby lights and draw attention, but this hidden layer should support the main design rather than compete with it.
Stagger the ornaments instead of forming straight rows. Place one slightly high, the next lower, and another farther back. Leave some open space so the lights can glow between them.
This inner ornament layer gives the tree a fuller look without covering every outer branch. It also adds depth with fewer costly or decorative ornaments.
Step back after placing half of them. If one area looks heavy or dark, move an ornament to a brighter section before adding ribbon.

3. Set the Ribbon Framework
One continuous ribbon strip may seem faster, but it often pulls branches flat and exposes uneven spacing. Short wired sections offer better control and create softer movement.
Shape Loose Diagonal Curves
Cut wired ribbon into 24- to 30-inch pieces. Use 8 to 12 sections across a 7-foot tree, depending on the ribbon width and the amount of coverage you want.
- Tuck one end several inches inside the branches.
- Form a loose curve across the outer layer.
- Secure the center near a sturdy branch.
- Tuck the other end back into the tree.
Angle the pieces diagonally rather than placing them in straight horizontal bands. Let some curves travel left and others move right, but keep their direction calm and balanced.
Wired velvet creates rich folds, while mesh holds broad loops and reflects more light. Satin looks formal but may slip, so secure it with green floral wire.
Use ribbon turns to guide later ornament placement. A ribbon framework also creates depth and texture, reducing the need to cover the tree with excessive ornaments.
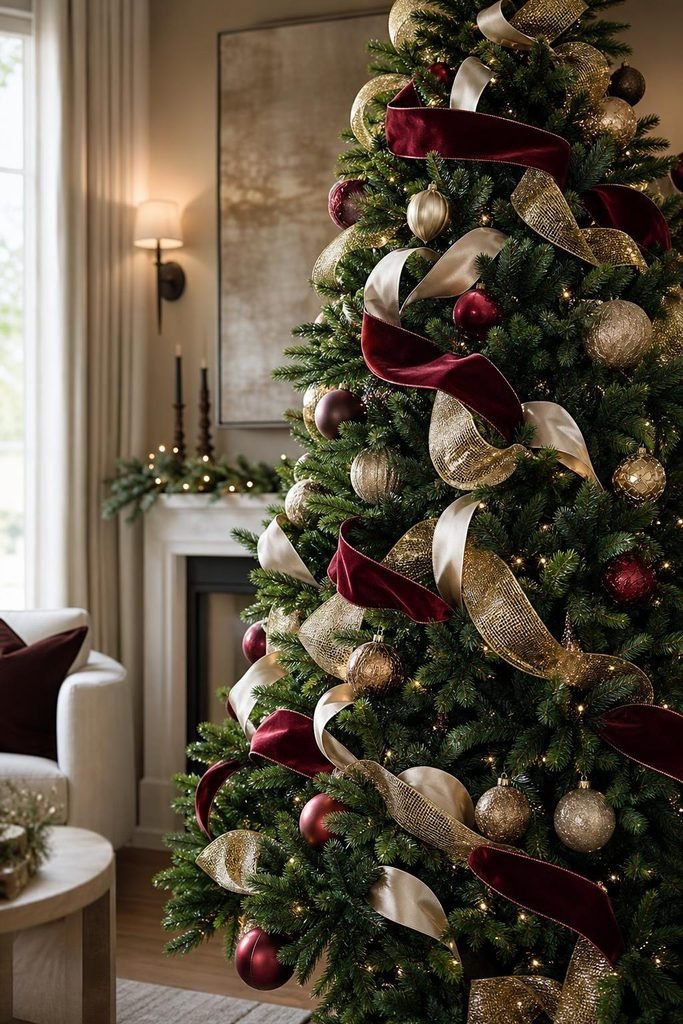
4. Map the Foundation Ornaments
Across the room, the tree should show an even rhythm of color and shine. Large ornaments catch your eye first, while medium pieces connect the open spaces around them.
Place 12 large ornaments on strong outer branches. Follow with 24 medium ornaments, alternating sizes and finishes such as glossy gold, brushed silver, clear glass, or painted ceramic.
Use Triangle Placement
Arrange ornaments in loose triangular patterns. Place one high, one lower and to the left, then one lower and to the right. This pattern feels balanced without looking stiff.
Step back after every six ornaments. Check for crowded clusters, empty bands, and matching colors placed too close together.
A glam tree can combine gold with silver and platinum pieces in four planned layers. The mixed metals look coordinated when one finish leads and the others act as accents. Keep foundation ornaments evenly spread before adding special pieces.

5. Finish with Focals and Topper
Where should the most distinctive ornaments go? Place them at eye level and beside ribbon turns, where the viewer’s gaze naturally pauses.
Add 6 to 10 focal ornaments. Leave open branches around each one so its shape, texture, or painted detail remains easy to see.
- Place keepsake ornaments near the front.
- Set decorative picks beside ribbon curves.
- Use florals or sprays to fill narrow gaps.
- Keep heavy pieces on sturdy inner branches.
Angle picks along the branches rather than straight outward, and secure their stems with floral wire. Position sprays near the upper third of the tree to connect the decorated branches with the topper.
Secure the tree topper with floral wire instead of resting it loosely on the highest branch. View it from several angles and align it with the tree’s visual center, which may differ slightly from the trunk.

Start With the Inner Layer
Dark matte ornaments offer an easy starting point because they create depth without demanding perfect color matching. Store them separately so you can rebuild that quiet inner layer each year.
Begin by setting aside 12 dark ornaments near the tree. Save this tree recipe for decorating day.